
Egg in a hole, more leftover Christmas ham, and pineapple. The pineapple was a dollar and tasted like it, so it made it’s final appearance New Year’s morning in a smoothie.

12.29.11 Dinner
Tomato soup (even with nonstop canning in August and September, I’m still going to run out of tomatoes before summer), grilled cheese on homemade bread, and pineapple.

12.27.11 Dinner
Leftover Christmas ham, california blend, and noodles in casserole form. This made a good dinner and an even better lunch for a couple of days! Sorry the applesauce doesn’t look particularly appetizing, but Meg sure likes it (“appo…saw”)!!

Review: Mission: Impossible – Ghost Protocol
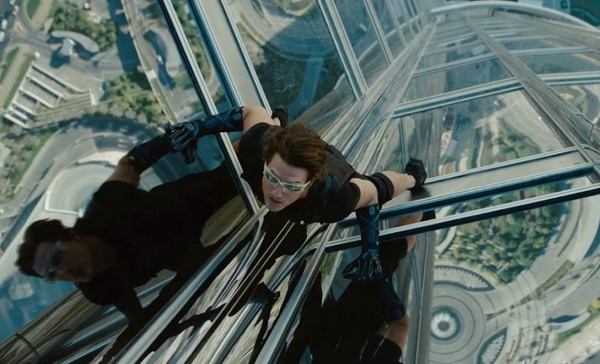
The Mission: Impossible series isn’t really one of my favorites, to be honest, and I’m not really sure why. They’ve always had pretty great directors, a star-studded cast (and Tom Cruise…), and usually feature great effects and acting. There’s just something about it that doesn’t hold up compared with the Bourne series, let alone Bond. I actually enjoyed Mission: Impossible III quite a bit, and even reviewed it (back when I didn’t write nearly as much…oh, to be him again…). The third installment was directed by J.J. Abrams, and his production company was still involved on the fourth and most recent one, which I think serves the movie well. This time out, however, it’s directed by Brad Bird.
What else has he directed?
Four movies. The other three, besides this one, are Ratatouille, The Iron Giant and The Incredibles.
Seriously.
So, for a director’s first time out with live-action, he did an unbelievable job. What Bird brought to this film, above all else, was a sense of fun. I can safely say I haven’t had this much fun at a movie in quite a long time. It was paced well, it was witty and genuinely funny at parts, the action consisted of some ridiculous set-pieces spread across Eastern Europe, India and Dubai, and the actors were at their best.
The story itself was somewhat simple, having the IMF framed by a villain set on remaking the world after nuclear war. He steals a set of Russian nuclear launch codes, in hopes of getting the world’s countries to annihilate each other, leaving the Earth “wiped clean” so that humanity can re-build. Thus, due to the framing, “Ghost Protocol” is enacted where the IMF is “disavowed,” leaving them to their own devices apart from the support of the United States government.
The team this time out consists of Jeremy Renner, Simon Pegg, Paula Patton, and their leader, Tom Cruise (the only one that’s made it through all four outings now). Renner and Pegg serve their purposes well, with Renner as something of a “straight man” and Pegg as the comedic odd-ball. I’d never seen Patton before, but she performed admirably. Cruise, of course, is Cruise. He’s always done well in this role, though the last two outings of the franchise, you can see an “aging” in the character, where Ethan Hunt is gradually more experienced, more grounded, and less “action star”-y (like he was in Mission: Impossible 2…then again, that was a John Woo film…).
The set-pieces in this film were phenomenal as well. There’s been quite a bit of news on the Dubai scenes where Cruise is climbing on the outside of the tallest building in the world, the Burj Khalifa, and believe you me, those scenes were ridiculous. Due to movie timing, we ended up seeing the movie in IMAX and that scene alone made the price of admission worth it. There were other chase scenes, a desert sand storm, and your typical gadgetry that made for excellent special effects and a wonderful spectacle, but the scenes in Dubai were glorious. There’s another scene toward the end of the movie where Tom Cruise and the villain, code-named “Cobalt,” are fighting in an Indian parking garage: one of those that is automated to elevate your car through the middle of a tall, concrete structure (kinda like one of these), and then drop it off for you. The choreography to get each actor in the right place as the “arms” carrying cars were moved in and out was very impressive.
My one knock on the movie was with the villain, “Cobalt.” It’s not that he was played poorly, or that the world-ending dilemma wasn’t dire enough. I just didn’t feel connected to the villain to any great degree. He was there, he was sinister…but I just didn’t care too much. Maybe it’s because I know how these movies tend to be resolved. I just wasn’t very engaged by him. The sense of urgency was the threat of a nuclear launch: not the villain himself. It’s something I can overlook, but more could have been done in that area.
In the end, it was pretty awesome. I’m certainly interested to see what Brad Bird does next, as he brought all the fun from his cartoon work to a live action film. It’s as if he said “what’s something we thought we could only do in a cartoon…’cause I want to do that with Tom Cruise.”
What’s a “blower motor resistor?”
Back in Iowa, we had a little issue with mice deciding to keep warm inside our cars. In the Sportage, they ended up chewing on the spark plug wires. In the Scion xA, a dead mouse was found in Brooke’s cabin filter (after it had been chewed through, in building a nest).
Around that time, though, her car’s fan stopped working at all the lower settings: it only worked on “high.” Since the fan still technically worked, and we didn’t want to pay some ridiculous amount of money to figure out what the problem was, we opted to let it go for awhile. We didn’t really need the car in the summer, so much, and if it was crazy hot (or crazy cold, as Iowa tended to be), then it could still be heated and cooled: just somewhat loudly.
Well, awhile back, Mallory started having a similar issue with her Jeep Grand Cherokee, so she and Mark started investigating and tracked it down to the blower motor resistor, which tend to be faulty in Jeeps. She ordered one and had Mark install it. As I happened to be in town, I helped (read: watched…) Mark put it in. In total, it was a relatively simple process, with the removal of the glove compartment being the most difficult part. Thus, I figured “heck, I could do that with Brooke’s car!” A new resistor is around $30, so it would save a ton of cash to do it this way, and I’d pretend to know something about auto repair in the process.
When this kind of thing happens to a car, it can either be due to the blower motor itself, or the resistor. Because the fan still worked on high, it was unlikely the fan motor was the problem. Conceptually, the idea of the resistor failing (the electronic unit responsible for applying a “resistance” to the speed of the fan, thus allowing for slower fan speeds) seemed to be likely.
Well, Brooke’s car, being a small, Scion xA, turned out to be a bit more complicated.
 After I removed the glove compartment, it took me awhile to even find the resistor. It wasn’t in the same place as a Jeep, and things tend to be a bit more cramped in a small, Japanese car like ours. The internet wasn’t much help in locating it, either, though I found a few hints (and no pictures…so hopefully this will help some poor schmuck someday).
I spent a great deal of time trying to figure out how to remove the white panel pictured above, which houses the fan motor itself, as it seemed like the resistor was somehow a part of that assembly. I didn’t have much luck removing it, though. Beneath that panel was an engine relay assembly, and that was a bit easier to remove.
 I was careful to write a few numbers on these wires, so I wouldn’t accidentally put them back in the wrong ports. Then, removed the assembly and…
 ….there it was…way the hell back up behind that white, plastic, fan motor assembly. And, believe you me, I had to contort myself in any number of ways to get into a position where I could even remove the thing. Only took two screws, but getting a screwdriver to fit back there was challenging. After a little maneuvering, I removed the resistor.
 So yeah. Not supposed to look like that. Obviously. In general, electronic devices don’t like birds, mice, or nests being made upon them.
In the end, I was able to get the car re-assembled and the new resistor works. $30 fix from the O’Reilly Auto Parts up the street. Took me about 2 hours, though most of that time was spent trying to find the stupid thing in the far reaches of the void behind the glove compartment.
Regardless, I was pretty proud of myself. 🙂
New Brewing Toys
 While I received quite a new wonderful gifts for Christmas this year, I thought I’d mention a few of the brewing-related ones here. Firstly, as you see above, my talented sister was kind enough to design beer bottle labels for us! Two different versions, both of which look quite good (though the “hop”-containing green one is probably my favorite), and labeled “Andy & Brooke’s Linsenbrew.” How exactly we never thought of “Linsenbrew,” I’ll never know, but I certainly got a kick out of these. I’ll probably only use them on beer batches I save for aging, and for those I take places or give away (these three are destined for my cousin, for example), but I’m very glad to have them!
In other brewing news, we got some additional equipment that I’m looking forward to trying. We got two wort chillers, which are essentially just “radiators” that pump cold water through copper tubing that you put into the wort after you boil it for an hour. It’s important to cool the wort down as quickly as possible before adding the yeast, and up until now, we’ve usually filled the sink with ice and cooled it down that way (frequently taking 2+ hrs…). Now, we have a means of cooling it down much more quickly, which will cut down on brewing time considerably. We’ll probably use one of them for beer, and the other we’ll use for Brooke’s yogurt, which also requires a cooling step before you’re done. Each chiller has slightly different fittings, so we haven’t decided which one will be used for which purpose, but regardless, we’re looking forward to giving them a try.
I also got a bottle drying rack, similar to this one. Usually, I just clean each bottle and let them dry upside-down in laundry baskets. This is a “functional” solution, but isn’t exactly ideal. I usually need around 45 bottles cleaned, with the remaining beer going in 1 L or 2 L bottles. This drying rack should take up far less space and leave the laundry baskets available for…you know…laundry…
Finally, we got a Chinook IPA beer kit. This is a kit I’d considered doing awhile back but hadn’t tried it yet. The key reason I wanted it was because it only takes around 6 weeks to make, while other IPA varieties like to have 2 months fermenting, followed by bottling and conditioning. The last IPA I made got quite a bit better with an additional month of aging so, while I thought it ended up fine, it sure took a long time to be “drinkable.” Hopefully, this recipe solves that issue.
So yeah, got some new toys for Christmas to feed the beer brewing needs. I may get a chance to brew this one on New Year’s Day, but could push it off a bit, yet. Then, we need to start thinking about what the next batch will be, likely either a Cream Ale or a Czech Pilsner. We’re trying to get a recipe that’s radically different from the others we’ve made, as the Dunkelweizen that just finished tastes pretty similar to some of the others we’ve made.
Happy Holidays

From the Linsenbardt family to yours, we wish you a merry Christmas and a happy New Year. Be safe and have a good time with family and friends this season!
Potato Candy!
I had a potato candy revelation this year. In the past, I’ve made plain candy, mint, cherry, chocolate, coconut, and nut. Why I never thought about peanut butter, I’ll never know. So, this year, I went with peanut butter candy. Andy usually does the chocolate dipping because it frustrates me when the candies don’t look perfect. But, we just dipped the bottoms this time and then drizzled more chocolate on the top. I think they look super pretty and taste even better. The new and improved method/recipe is below!

Ingredients:
- Medium potato (about the size of an adult’s fist)
- 2 pounds powdered sugar
- 1 cup peanut butter
- 1 tablespoon vanilla
- Chocolate (I used a combination of semisweet, milk, and baking, just to use up some ends of packages)
Method:
- Peel the potato and chop it into large chunks, as if making mashed potatoes. Cover chopped potato with water and boil until tender. Drain and dump potatoes back into your pot to make sure any remaining water evaporates.
- Mash potato and peanut butter together. If you happen to have a fancy stand mixer, feel free to do this part in there and save your arm muscles.
- Slowly mix in the first pound of powdered sugar. You’ll notice the potato sort of liquefies when you start mixing. That’s supposed to happen, so don’t freak out. Begin mixing in the second pound of powdered sugar, a cup or so at a time. You might not need the whole two pounds for your candy, but it was rainy the day I made mine, so I ended up needing it. The candy should just hold together when you try to scoop it, but not be sticky at all.
- Scoop the candy using a small cookie scoop (or bigger if you want). Line the scooped candy up on a Silpat or parchment lined baking sheet that will fit in your freezer. Freeze for a few hours until firm and dry.
- Dip candy in melted chocolate. If the candy becomes too soft to easily dip, put the tray back in the freezer for awhile. Drizzle additional chocolate on top in a “Z” pattern.

12.13.11 Dinner
Last Tuesday’s Family Dinner. Biscuits and gravy, hashbrowns (made in the oven), and fruit. You can’t really see the food in this picture, but my sisters are usually the most fun part of Tuesday night dinners, anyway, so you get to see them!

12.09.11 Dinner
Pork roast with carrots, potatoes, and onions. We were supposed to have this the day before we did, but I forgot to plug the Crock Pot in. This is not the first time this has happened, either….